Updated on GitHub 4 months ago (see history)
How to install LUKS-encrypted Debian operating system using bootable installer
Requirements
- Debian-compatible computer with AES instruction set
Guide
Step 1: insert bootable installer
Step 2: disable Compatibility Support Module (CSM) (also known as “Legacy Support”) and enable Secure Boot
Heads-up: step is non-deterministic given manufacturers use different BIOS keys to boot to BIOS and menus to set UEFI features.
Heads-up: on some computers, a “Fast Boot” feature is enabled making it hard to enter BIOS keys… disconnecting disk temporarily disables “Fast Boot”.
On HP EliteDesk 800 G2 Mini, press F10 when HP logo appears, go to “Advanced” tab, select “Secure Boot Configuration”, press enter, select “Legacy Support Disable and Secure Boot Enable” under “Configure Legacy Support and Secure Boot”, press F10, when asked to save changes, select “Yes” and, finally, press enter.
Step 3: boot to bootable installer
Heads-up: step is non-deterministic given manufacturers use different BIOS keys and default boot orders.
On HP EliteDesk 800 G2 Mini, press F9 when HP logo appears, select bootable installer device and, finally, press enter.
Step 4: start installation
Select “Install” and press enter.
Step 5: select language
Select language and press enter.
Step 6: select location
Select country, territory or area and press enter.
Step 7: configure keyboard
Select keymap and press enter.
Step 8: configure network
Set hostname
Enter hostname and press enter.
Set domain
Enter domain (typically left blank) and press enter.
Step 9: set up users and passwords
Set root password
Heads-up: truly random 5-word passphrase or 12-character password (or longer) recommended.
Enter root password, press enter, re-enter password and, finally, press enter.
Set full name of new user
Enter full name of new user and press enter.
Set username of new user
Enter account username (typically left as-is) and press enter.
Set password of new user
Heads-up: truly random 5-word passphrase or 12-character password (or longer) recommended.
Enter user password, press enter, re-enter password and, finally, press enter.
Step 10: configure clock
Select time zone and press enter.
Step 11: partition disks
Set partitioning method
Select “Guided - use entire disk and set up encrypted LVM” and press enter.
Set disk to partition
Heads-up: data on selected device will be permanently destroyed.
Select device and press enter.
Set partitioning scheme
Select “All files in one partition (recommended for new users)” and press enter.
When asked to write changes to disk, select “Yes” and, finally, press enter.
Overwrite encrypted partition
Heads-up: can be cancelled at the expense of slightly weaker encryption.
Set encryption passphrase
Heads-up: truly random 5-word passphrase or 12-character password (or longer) recommended.
Heads-up: can be set to user password at the expense of reduction in security.
Enter encryption passphrase, press enter, re-enter passphrase and, finally, press enter.
Set volume group size
Enter amount (typically left as-is) and press enter.
Delete “swap” logical volume
Select “Configure the Logical Volume Manager” and press enter.
When asked to write changes to disk, select “Yes” and press enter.
Select “Delete logical volume”, press enter, select “root” and, finally, press enter.
Select “Delete logical volume”, press enter, select “swap_1” and, finally, press enter.
Select “Create logical volume”, press enter, select volume group, press enter, enter “root” as “Logical volume name”, press enter, enter “Logical volume size” (typically left as-is) and, finally, press enter.
Select “Finish” and press enter.
Select “LVM” logical volume “#1”, press enter, select “Use as”, press enter, select “Ext4 journaling file system”, press enter, select “Mount point”, press enter, select “/ - the root file system”, press enter, select “Done setting up the partition” and, finally, press enter.
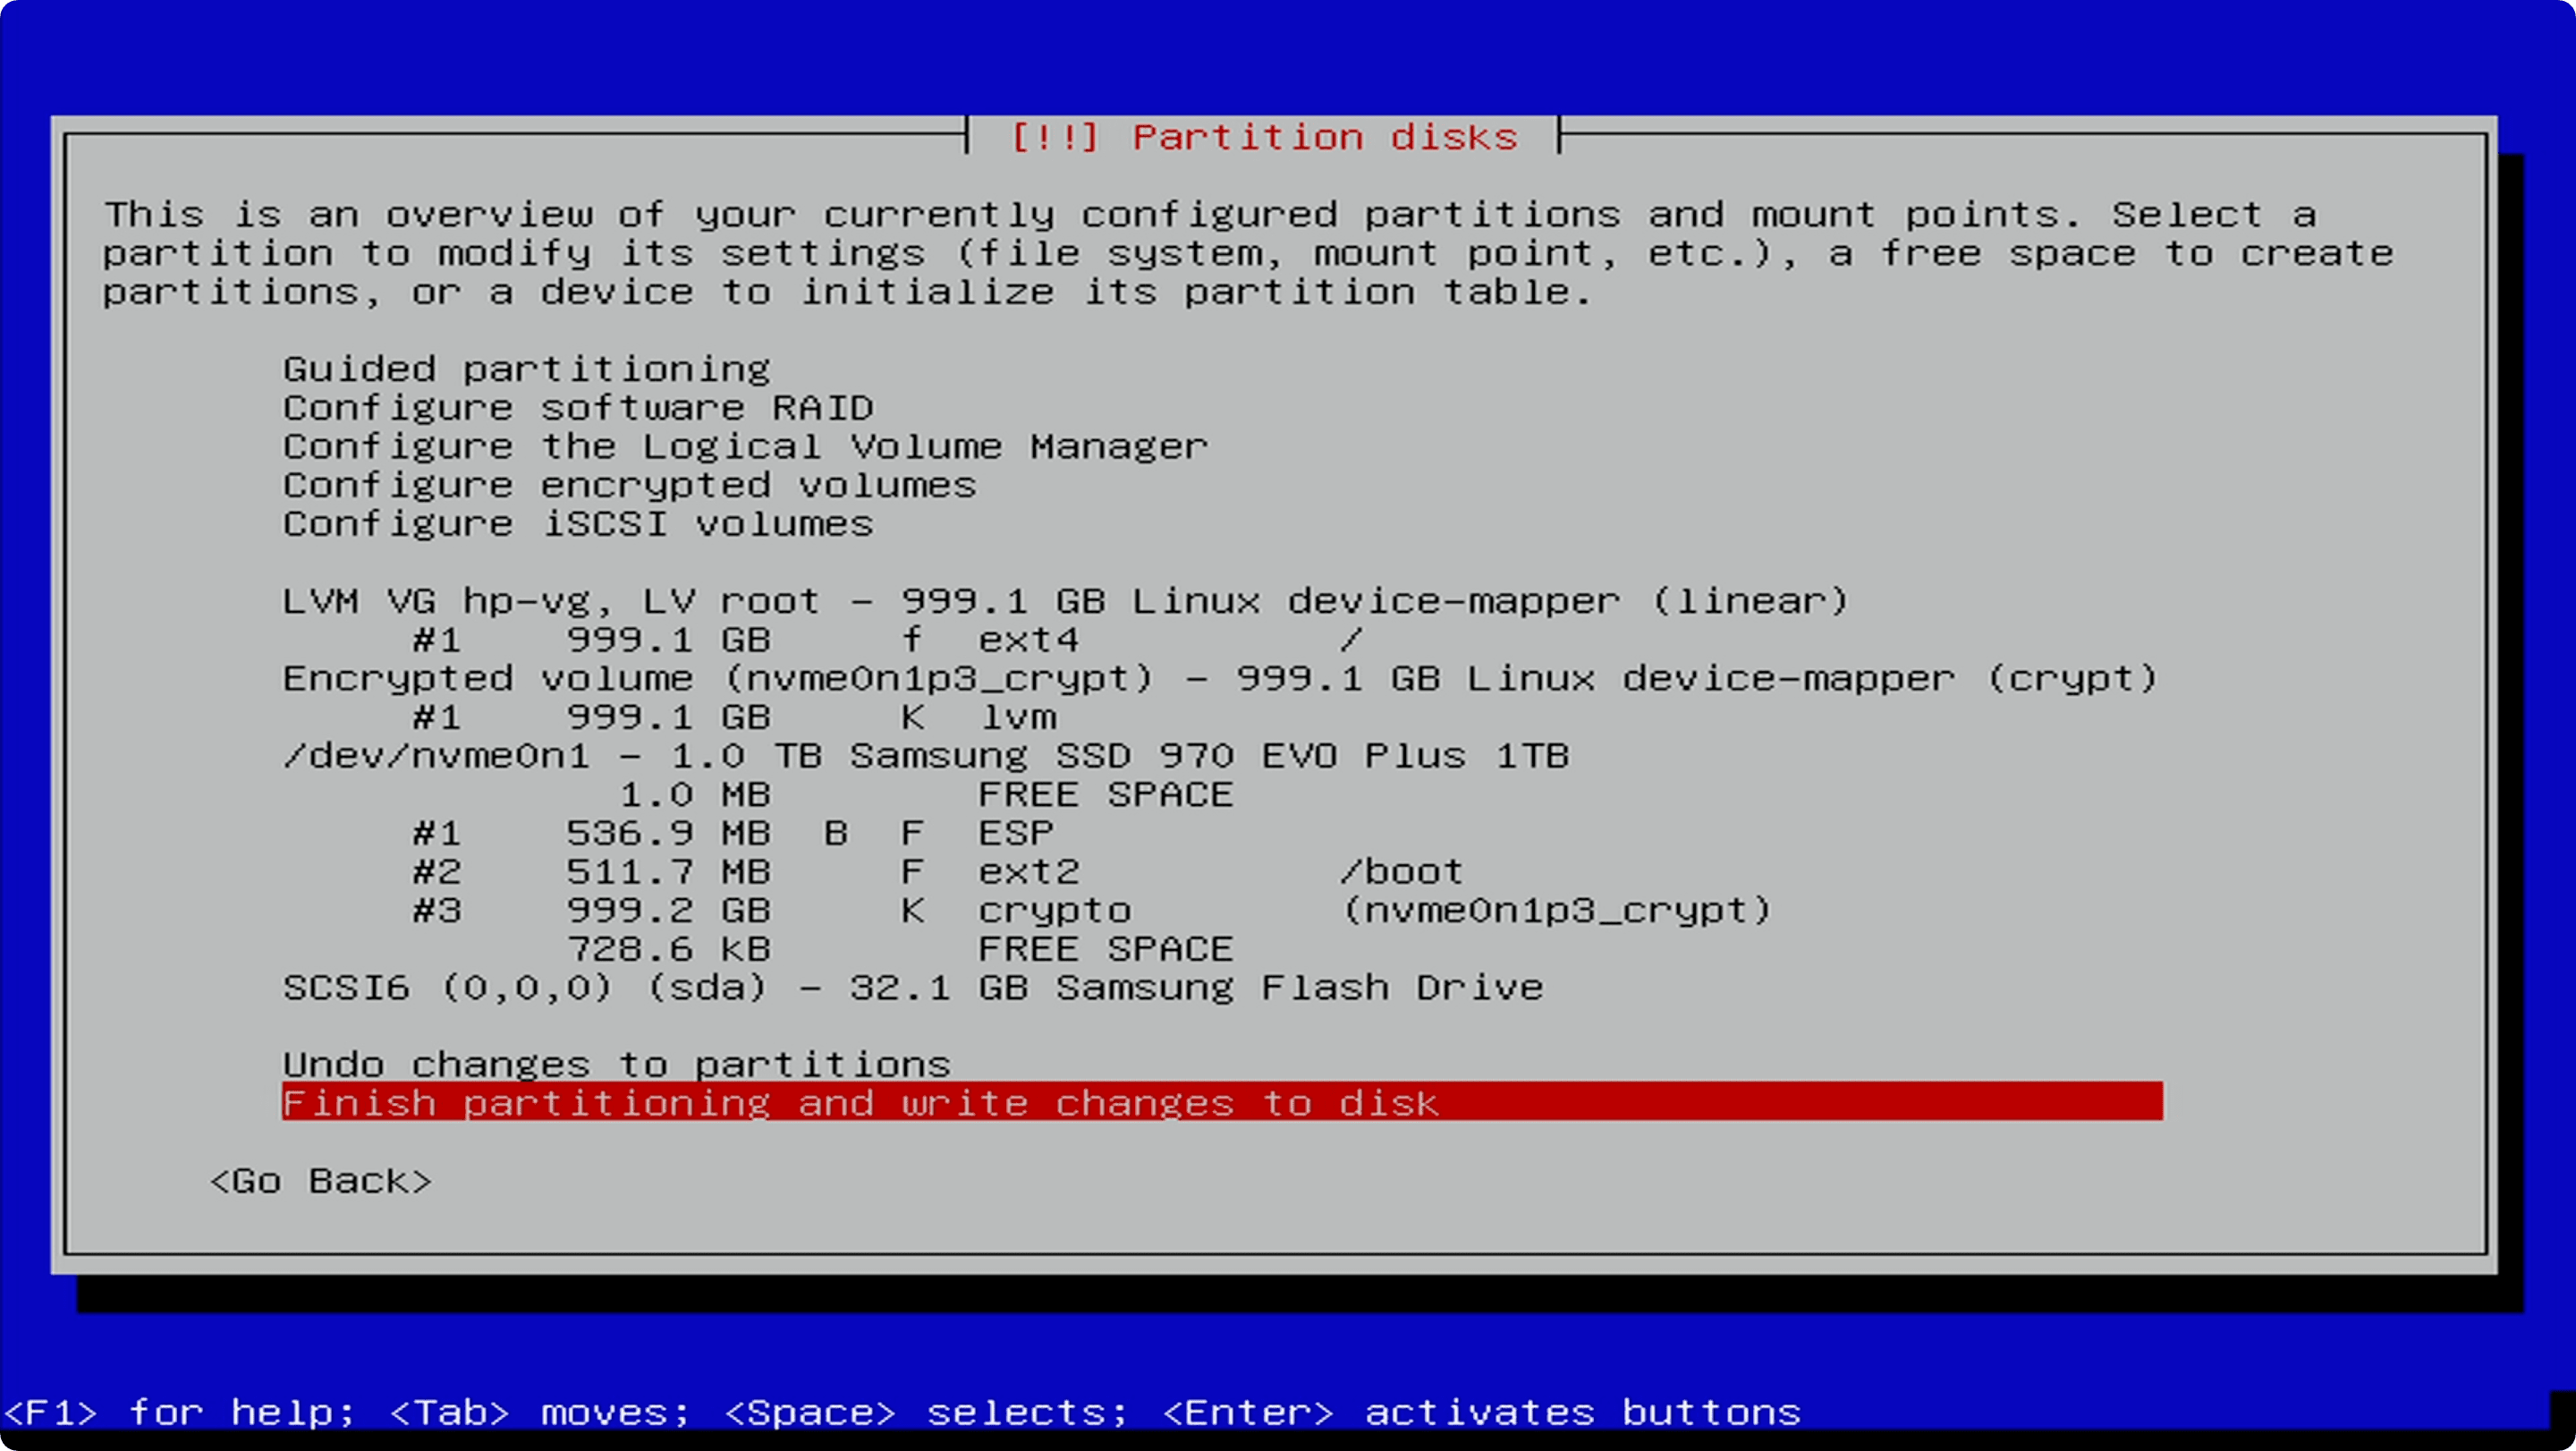
Select “Finish partitioning and write changes to disk” and press enter.
When “Do you want to return to the partitioning menu?” warning is displayed, select “No” and, finally, press enter.
When “Write the changes to disks” prompt is displayed, select “Yes” and, finally, press enter.
Step 12: configure package manager
Set archive mirror country
Select Debian archive mirror country and press enter.
Set archive mirror
Select Debian archive mirror and press enter.
Set proxy
Enter HTTP proxy (typically left blank) and press enter.
Step 13: configure popularity-contest
Select “No” and press enter.
Step 14: select software
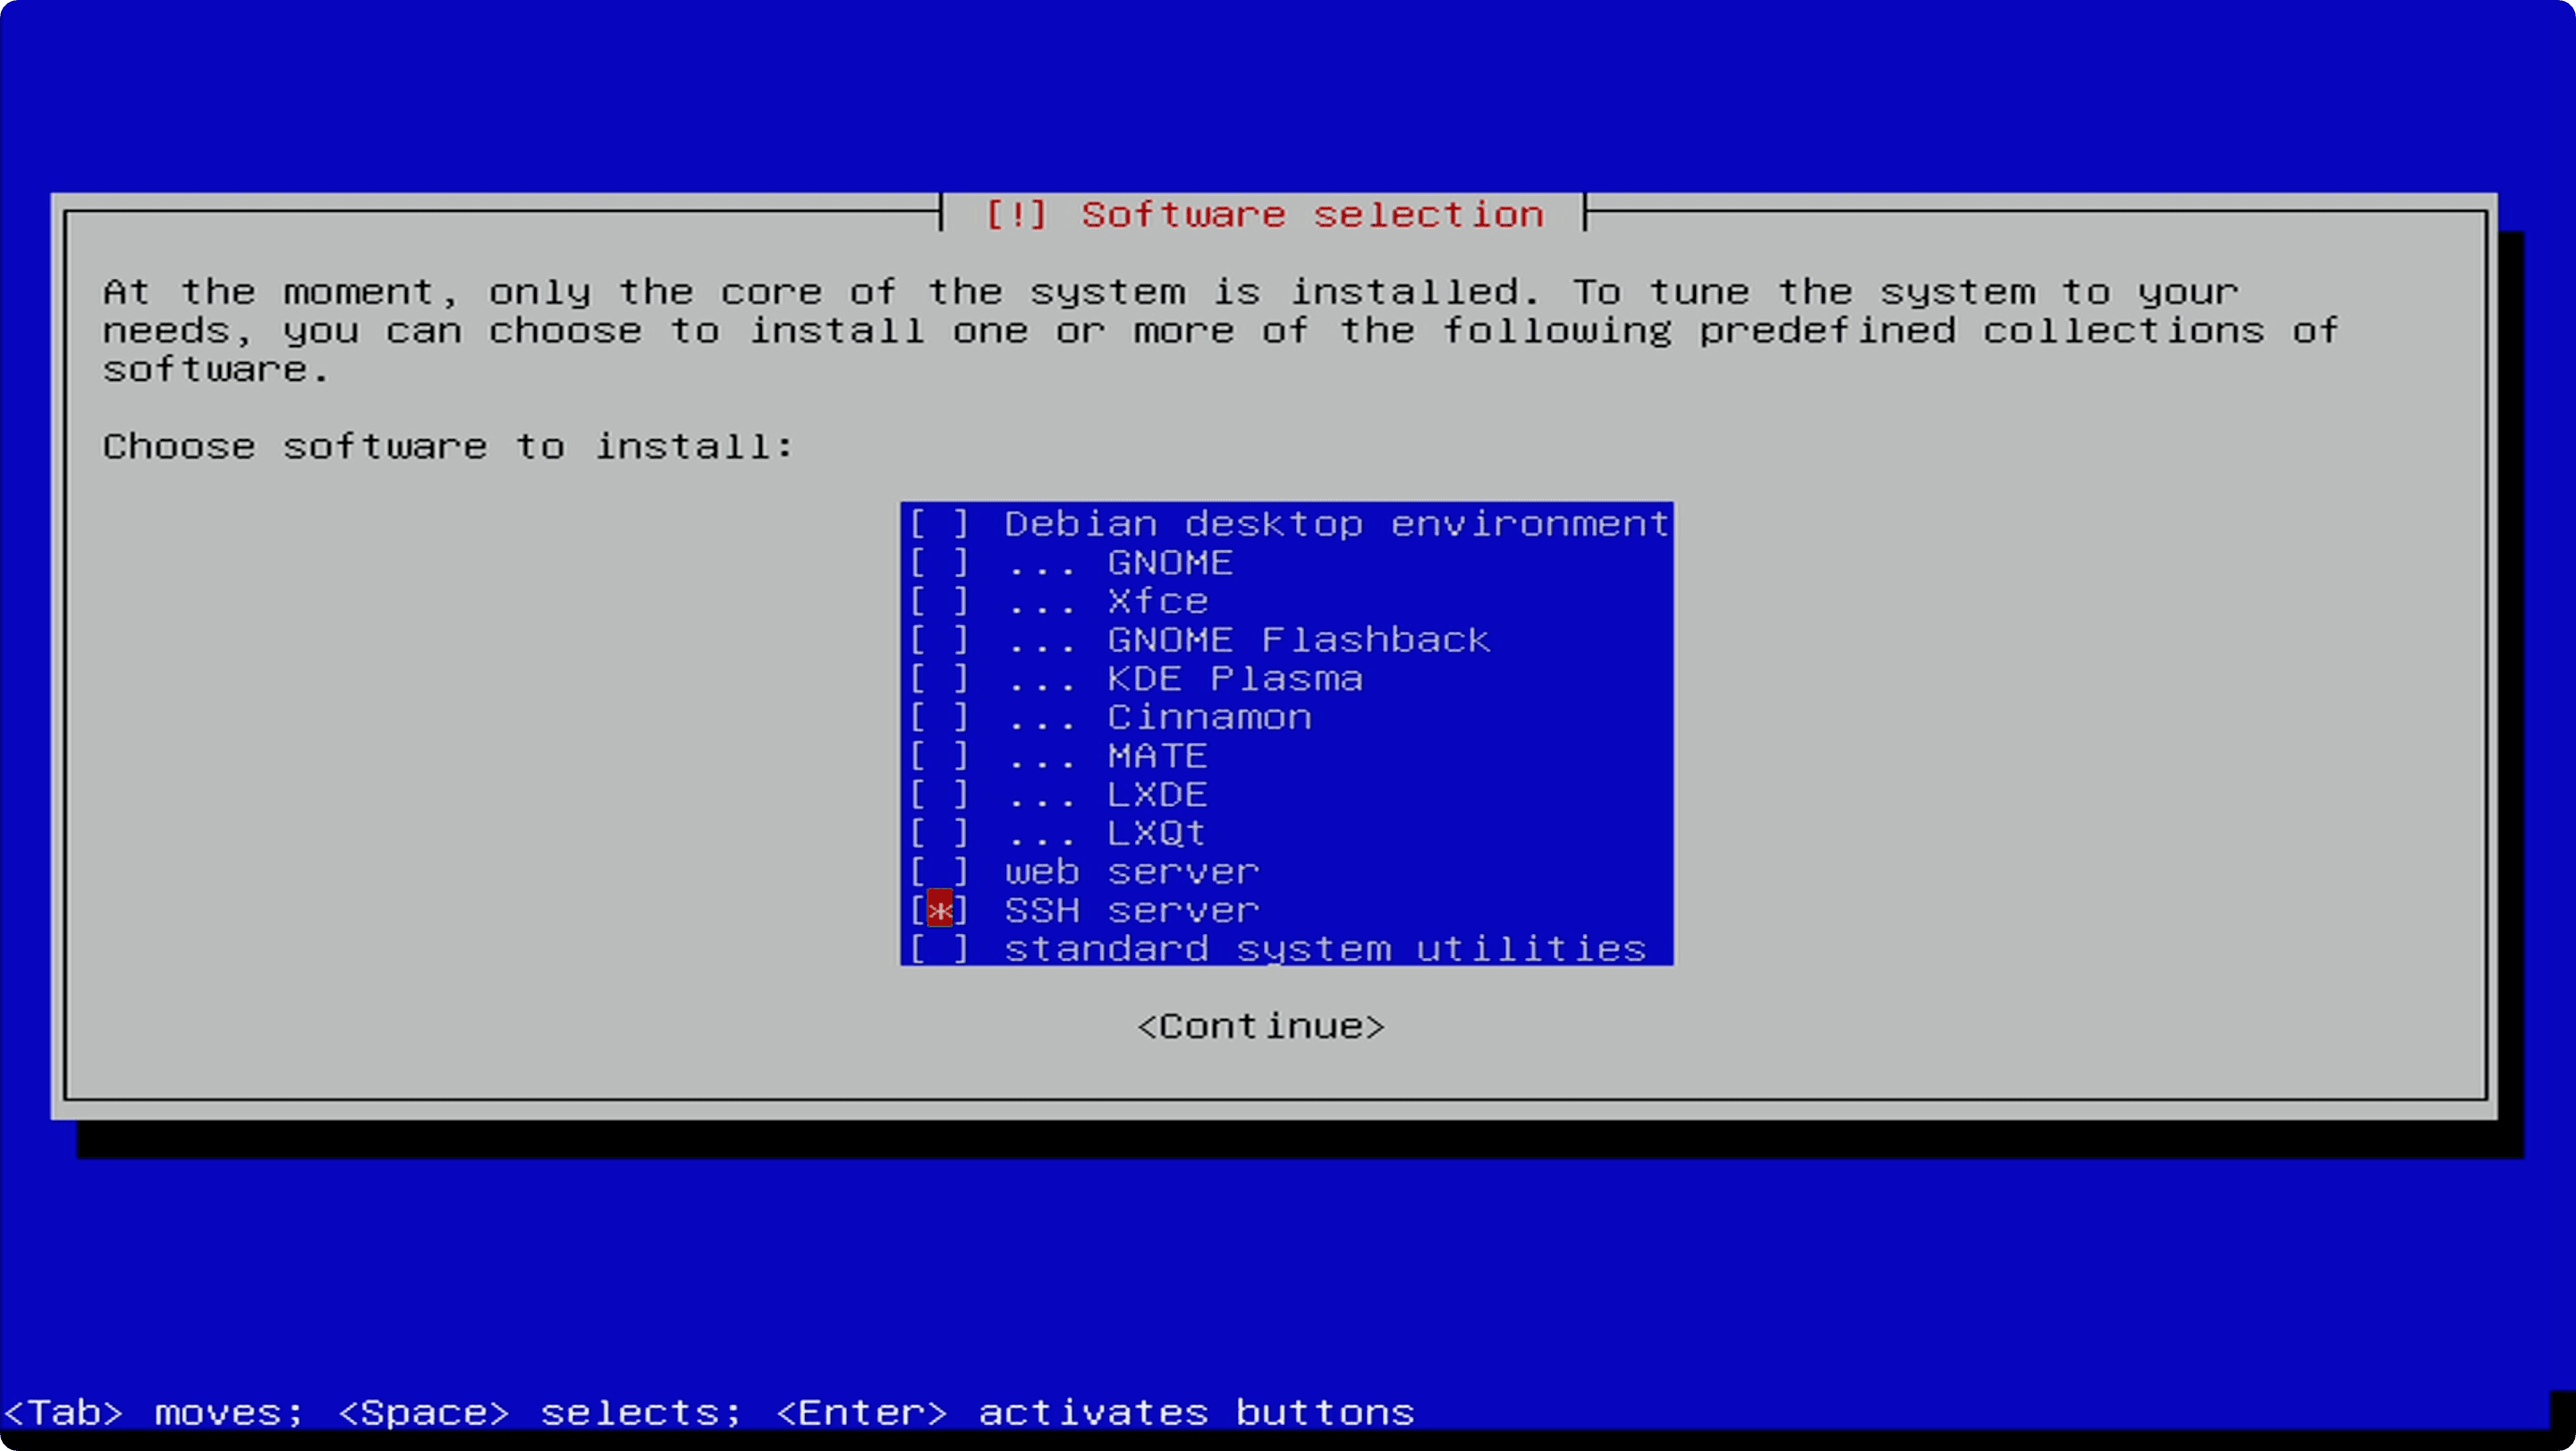
Using space bar, disable everything except “SSH server”, select “SSH server” and, finally, press enter.
Step 15: finish installation
Remove bootable installer from computer and press enter.
👍